end grain update
open main page here
END GRAIN CLOSEUP --- NEW TECHNIQUE
When I started this site I did not do end grain closeups, as my camera did not have a "macro" capability.
In 2005 I got a better camera and started doing end grain closeups. The camera had an EXCELLENT macro capability and the focus and magnification on the end grain shots were both terrific. Unfortunately, my efforts to clean up the end grains that I was photographing ranged from ineffectual down to pathetic. Since many of the samples came to me with a cleaner end grain surface than anything I was doing at the time, I left them alone and so many of the end grain closeups on the site are fairly decent, but at their best they have never been anything to write home about as you can see in the original end grain discussion. Mostly, they do a reasonable job of showing the general layout of the pores, but fine detail is obscured by scratches from the 200 grit sanding.
Now (early 2013) I've purchased a very good ROS and a set of pads that go from 60 grit up to 1200 grit and if I spend the necessary time going carefully through numerous grits, they produce a glass-like finish that is a HUGE improvement over the old versions. It is VERY time consuming --- I have to spend 15 to 20 minutes sanding, over and over and over (with different grits) an area about 3" x 8" just to do 10 samples at a time. UGH! The process is shown, and discussed in more detail, at the bottom of the page.
Here are a few examples of the kind of differences that this new technique produces:
The apparent darkening of the wood in the newer pics is entirely because of the way very smooth (low surface area) wood reflects the light (making the wood look relatively dark) as opposed to how it is reflected by the far larger and more diffuse surface area in the rough wood (making the wood look relatively light).
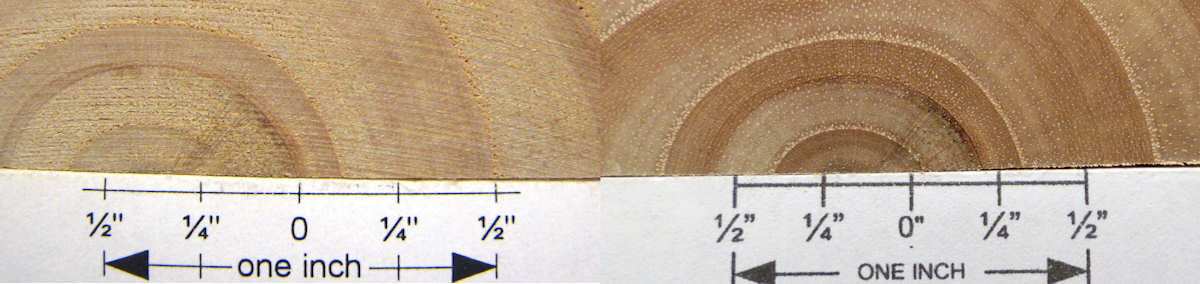
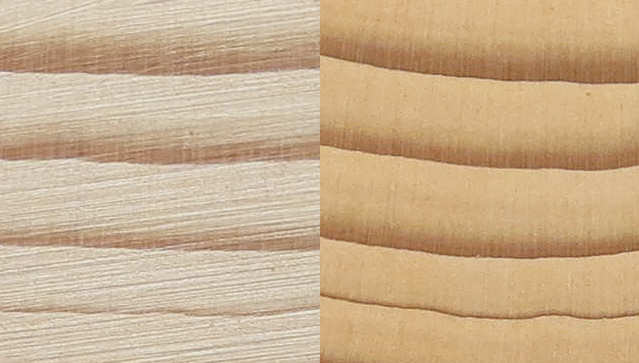
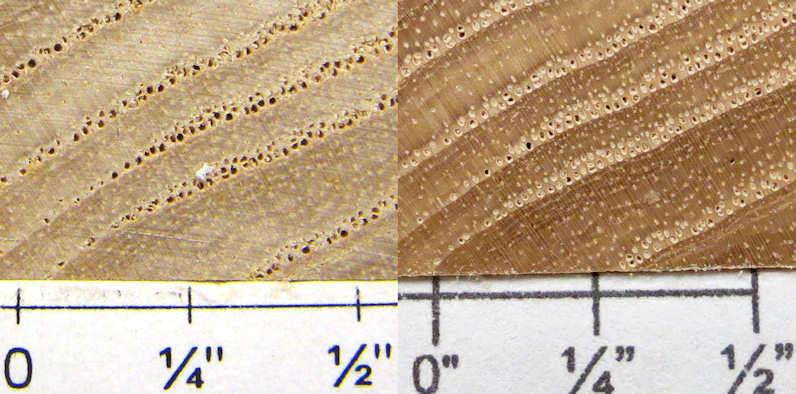
This is a 1" x 1/2" section of Douglas-fir before and after fine sanding. This particular piece was chosen for this illustration because the "before" is a very rough end grain that diffuses the light in all directions and thus appears very light whereas the "after" is, like all such, MUCH smoother and reflects most light off at the same angle at which it hits the piece, thus missing the camera. NOTE: this particular processed end grain has a slight pink tint that should be ignored --- it's from the particular sanding paper I used.
To give some idea what I'm talking about, the following very graphic (created for me by Dave Collins, whom I thank) shows how this works, with a good approximation of the actual physical setup used to take the pics.

On the left is a rough surface that reflects incoming light rays in all directions and on the right is a smooth surface that reflects incoming light rays at the same angle as that at which they hit the surface. This is a very simplified representation of the light rays but is intended to show how it is that a rough surface reflects a lot of light to the camera and a smooth surface does not. Because of the light intensity, the two surfaces often show very noticeably different colors with the rough being very light-colored and the smooth being much darker and with a more intense color.
For those of you with a scientific bent, this phenomenon is well understood, and is described by the terms "specular reflection" (reflection off of a smooth surface) and "diffuse reflection" (reflection off of a rough surface).
Some of the porous woods get their pores clogged up with the fine dust when I do the sanding, so at first glance it can even appear that the updates are worse than the originals but a look at the enlargements will always show much better fine grain detail in the updates
On the left is a typically poor end grain shot (a piece of velvet ash, as the plank came to me and as I originally posted it for an end grain shot) and then on the right the update, which shows pretty dramatically how much better the new technique is, then below that is a 1/2" section of each at about a 10X magnification to really show the difference and to illustrate how the new technique exposes the fine grain details that are not at all apparent in the rough surface.
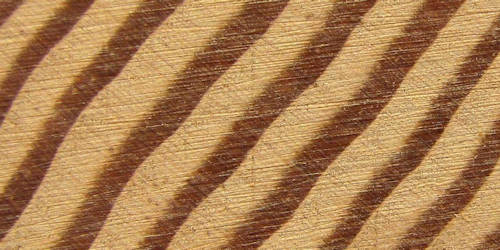
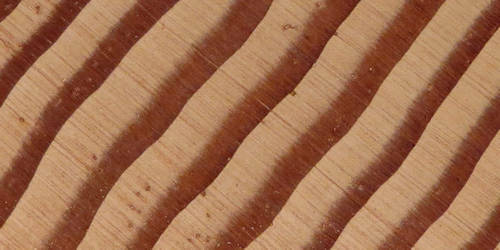
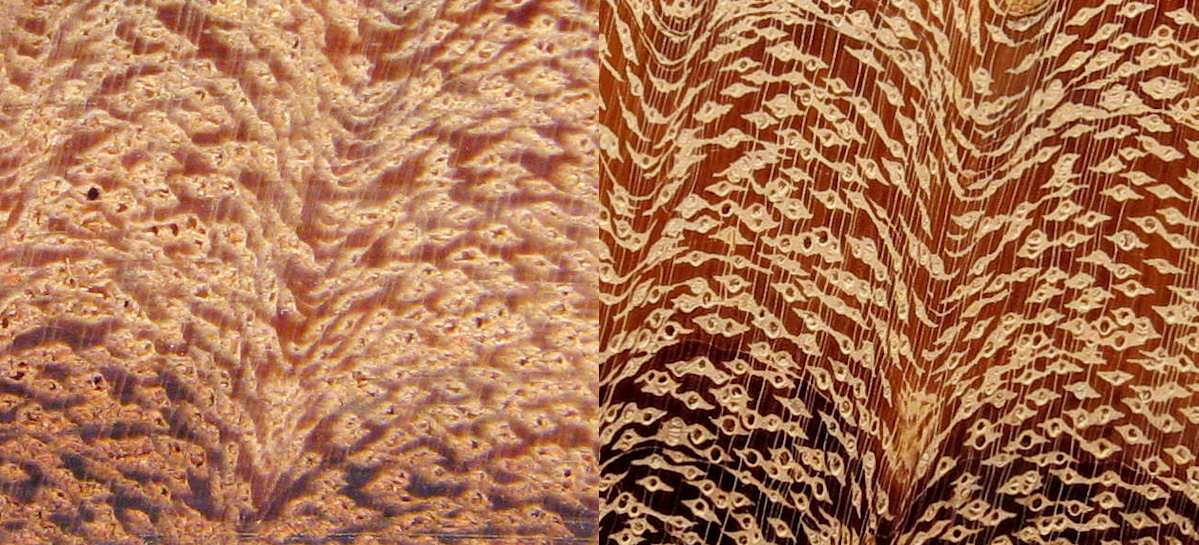
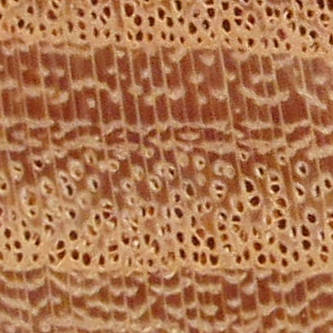
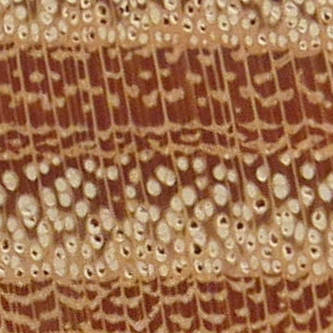
And now a really striking display of kempas --- a 1/2" section before and after at about a 10X magnification
and now a few more just to show some of the other characteristics of the new technique:
construction grade pine with 200-grit on the left and 1200 grit on the right, showing how particularly on softer woods, the 200-grit leave gross scratch marks that are completely gone in the 1200 grit. The piece on the right looked exactly like the one on the left before the 1200 grit sanding and the darker color is totally due to the way light reflects differently off of the smoother surface.
white ash showing how the 1200 grit shows up fine detail much better than 200 grit.
olive ash showing particularly well how some of my really crappy early jobs with the 200 grit belt sander are dramatically improved with the 1200 grit ROS. As with many of the updated surfaces, the 1200 grit surface reflects light much differently and looks darker as a result.
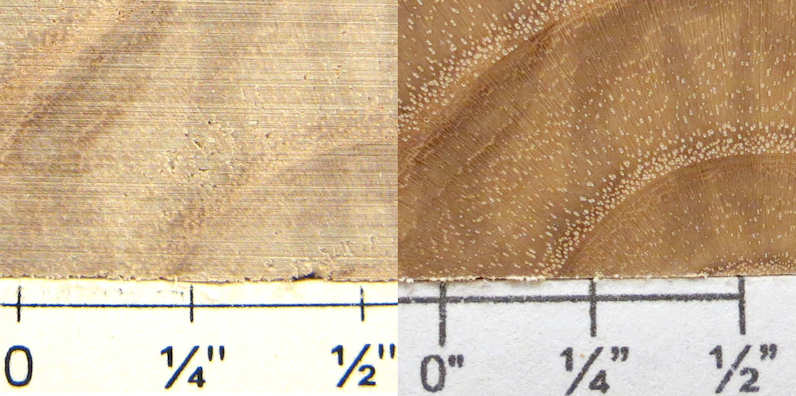
pumpkin ash piece showing a less successful attempt at having the 1200 grit give a better image. It IS actually better in detail (check out the fine rays going from lower right to upper left, particularly in the enlargement) but the piece as I got it was cut with a very sharp circular saw blade and shows the pores really well whereas the 1200 grit sanding has left the pores clogged with very fine powder.
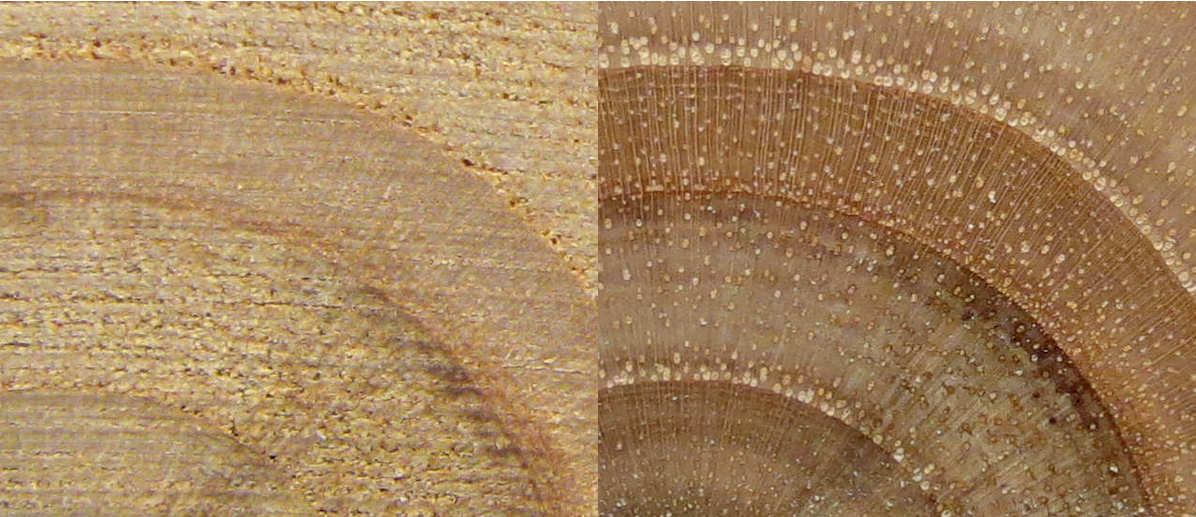
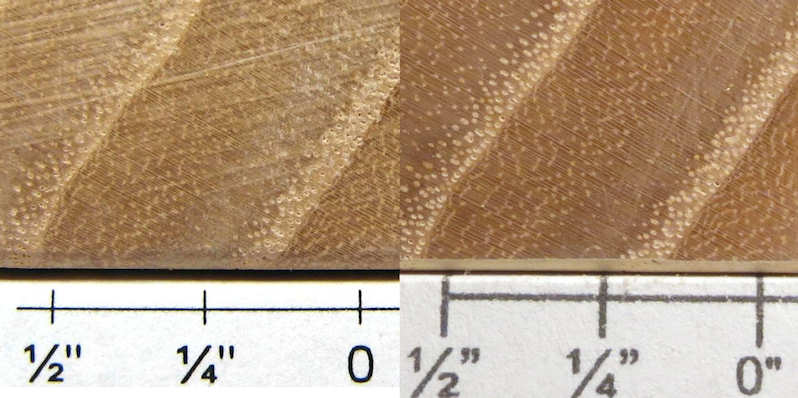
a 1/4" x 1/4" cross section of a piece of honey locust cut with a very sharp circular saw and then the exact same area after my fine grain sanding. As you can see, the pores after cutting are relatively clear but after sanding they are mostly clogged with fine dust. The rays, latewood pores, and latewood parenchyma, however, are all more sharply delineated after the sanding.
THE PROCESS
With comments on both of the 2 pics below, I show
- the setup
- why it has to be perfect
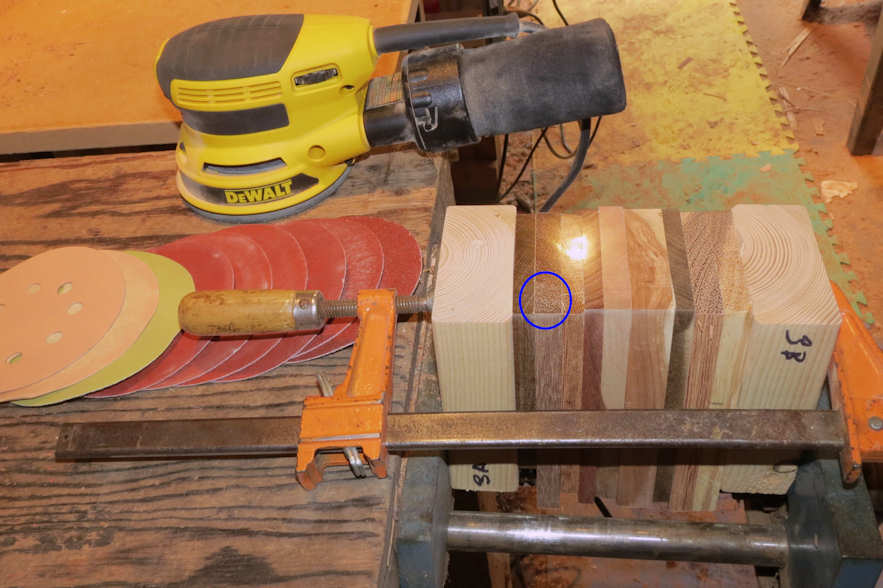
This is the setup showing how I do 10 or so at a time. Two levels of enlargement are present if you click on this pic. The process is something like this:
- make sure each end grain to be process is more or less flat
- put the batch together upside down
- bracket with pieces of scrap (I use old pieces of 2x4)
- clamp near the end to be worked, with a bar clamp
- put the batch right side up into a bench clamp [this is the pic above]
- sand with a low grit (I usually start with 60 or 80) until the batch presents a TOTAL surface that is flat, with each piece perfectly lined up with the next along its entire width
- sand successively with various grits for a minute or two per grit
-
- I typically use a sequence something like the following and the whole process takes 10 to 20 minutes (generally more like 10 to 15) or even a little more depending on how hard the wood is and how good a job I'm doing
- 60 or 80
- 100 or 120
- 150 or 180
- 220
- 320
- 400 normal
- 400 stearated (that's the yellow one in the pic)
- 800
- 1200
I use high quality (Klingspore) hook and loop pads for a DeWalt 3.5amp 8-hole 5" ROS but most any decent one should do. When I get to the 800 grit I fully deplete one pad for one set and the same for the 1200 grit --- this ends up with a surface that has a almost-glass-like polish as you can see from the reflection of an overhead light on the set.
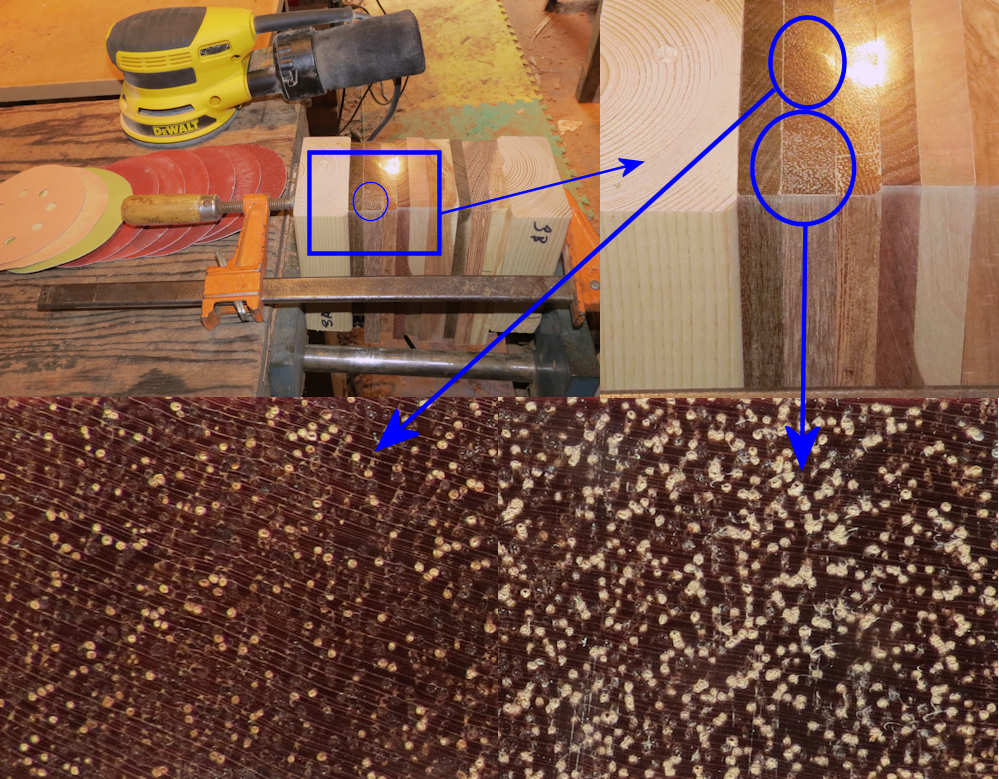
Here's an example of why it MUST all be done with considerable precision. In the pic above I've blown up the area circled in blue. I did not do an adequate job in getting all of the pieces in the batch to be totally aligned with the low grit. One edge of one sample drooped a bit below the rest of the batch's surface and as a consequence did not get well sanded by the subsequent grits. It was not obvious to me that this had happened until I was up to the 320 grit and I didn't want to start the whole batch over so I kept going.
The result is shown in the lower 2 enlargements. The area that did not get properly sanded still has the pores somewhat crushed from the initial cutting of the end on a circular saw and they have filled with fine dust. Also, the rays to do show up well at all. The part that did get properly sanded shows the proper sized pores and much better fine-grain detail, particularly the rays.