open main page for all woods          open page 2 for articles


HOW IMAGES ARE HANDLED ON THIS SITE


This page has three sections:

First, I state, in the red-bordered box below, exactly how I deal with JPEG pics for this site.

Second, I give a moderately brief discussion of why I do what I do.

Third, I give a long, boring, detailed discussion and technical demonstration of what I'm talking about.

Stop whenever you get bored. Right now would be good. Go back and look at wood pics. They are much more interesting.


FIRST the box:

HOW THIS SITE DEALS WITH JPEG PICTURES

SIZE: Throughout the site, you will see references to "enlargements". That terminology makes sense from the point of view that what you first see is what you naturally think of as the original, so the larger version is naturally thought of as an enlargement. Technically, however, it's the other way around. The "enlargements" are the original pictures and the smaller versions that show first are actually reductions from the original. True enlargements of JPEG pics do not increase the quality of the pic, they just make it bigger and blurrier. The way I do it, when you look at an "enlargement" you are looking at a higher-resolution original.

COLOR: The quality setting on ALL the JPEG pics is 70%, which for complex pictures such as those of wood cannot be distinguished from 100% by the human eye. This provides an 85% to 90% reduction in file size with no noticeable reduction in apparent quality on a computer screen (it WOULD be poor for printing a large hardcopy).


SECOND the moderately brief discussion

I am not even remotely a professional photographer or a computer graphics person, and prior to starting this site I had never done anything with either one. I found, as I played with low end computer graphics software that I could do what I felt needed to be done to accomplish what I wanted on the site, but sometimes the pics got messed up in unexpected ways. Zebrawood pics were a good case in point. They would start to look jagged when I reduced the pics. To make a long story short, I decided that I needed to find out more, so I played around some and this page is a summary of my results.

Unless you have some particular interest in such technical stuff, this will all be deadly dull and I suggest you not bother with it. If you plan on doing any web site work with pics, you might find a good piece of information or two.

First off, why care at all about any of this? Why not just post the pics as I get them with the best quality? There are two reasons. First, the pics come in all sizes and the pages would be a real jumble with some pics being almost full page sized and others being just thumbnails. So I needed some way to normalize the size without ruining the quality. Second, for people without high speed Internet access, the pages would take impossibly long to download If I left everything full size and full quality. Some of my pages have hundreds of pics, and if each were 400Kb, a single page captured over a 56Kb modem would take about 10 minutes to download. I don't care how much you love wood, I can't see anyone waiting 10 minutes for a single page. [LATER NOTE: that was written back when low speed connections were common]

I'm going to summarize the two important findings I made right now in a couple of sentences and then the rest of this page is going to be a technical demonstration and detailed discussion. Unless you're a masochist, just take my word for the following two statements, which are the results of my research and the basis for how I deal with pictures on this site.

SIZE: Pictures in JPEG format can be reduced in SIZE by exactly 50% with no noticeable reduction in line quality. Other reductions (40%, 60%, etc) do NOT give as good a result.

COLOR: Pictures in JPEG format can generally be reduced to 60% quality without the human eye being able to see any reduction in color quality or edge definition, so I stick with 70% to be absolutely sure I haven't noticeably messed up the pics.

Now we get down to the nitty gritty, but first a corollary to the SIZE statement. Pictures that are reduced by 50% and then reduced again by 50% will have noticeably better quality than pictures that are directly reduced to 25% of the original. It is possible that this is an effect of the particular tools I have tried, but it SEEMS to be universal.

THIRD the long boring technical discussion --- masochists only, beyond this point
What I discovered was that there are two major factors in pictures as far as computers are concerned. These are the lines and the colors, and they are dealt with differently by computer software. I realized that I needed to figure out what trade-offs I could make between the four factors of (1) line quality, (2) color quality, (3) picture size, and (4) file size. That was my goal from the outset, and it did not change. I say again, the point of this entire exercise was to understand the relationships and tradeoffs among those four variables.

The picture size and file size were pretty easy to figure out. If you reduce a pic by 50%, you have reduced the area by 75%, so the file size should be about 25% of the original. This is indeed what happens, roughly --- it's not an exactly linear relationship. For small pics, the reduction may be only 40% or so, not 25% but for large pics it will be very close to 25%.

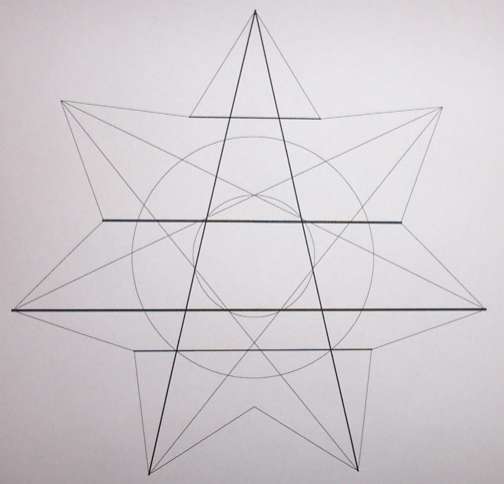
Color and line quality were much harder to figure out. What we have directly below is a VISIO line drawing that I made up and then printed out and scanned in and converted to a JPEG file for testing purposes. I could have converted it directly from VISIO to JPEG, but that would not have given me the color test I needed, it would only have allowed the line test. The background is white paper but the scanning, as I knew it would, converted the white just slightly unevenly in a way that shows up in extreme juggling of the color quality, as you'll see momentarily.

The "quality" setting that I talk about from this point on is actually an overall image quality setting, but what I've found is that it has far more impact on color quality than on line quality, and the resizing techniques have more impact on line quality than the "quality" setting does. SO ... I refer to the quality setting as though it were ONLY a color quality setting, which is not technically correct but is accurate for all practical purposes.

baseline image


A note about this "baseline" image: This is here to show you what the original (from which the pictures below were derived) looks like, but it is NOT actually the baseline image. This is a 50% size reduction and a 60% quality reduction from the actual scanned image. The file size of the original is 461Kb and the file size of this picture is 16Kb, a reduction of over 96% in file size. BUT, if you take the sheet of paper on which the original is printed and hold it up to the monitor and compare it to this image, you cannot see any differences other than the obvious fact that the image is half the size of the sheet of paper. THAT is what this is all about. Getting from a 461Kb file to a 16Kb file with no sacrifice in apparent quality. For a 65Kb modem download that's the difference between over a minute of download time and under 3 seconds of download time.

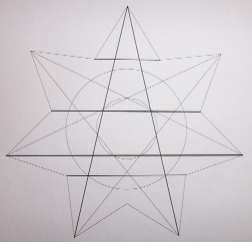
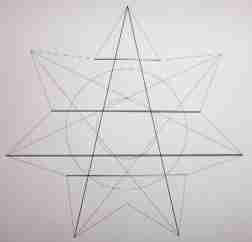
IMAGE 1: color quality at 60% and IMAGE 2: color quality at 20%

The color on the left version (60% color quality) is a smooth gradient and the color on the right version (20% color quality) is not smooth at all. Look in the upper left corner of the right pic and you'll see blocks of color. Once you see what to look for, you'll notice it throughout the pic. It isn't until you get down to about 20% quality that it becomes this noticable, but I could see the faint beginnings of it in some wood pics at 40%, so I have used 60% throughout the site. At 60% quality, the size of the pic is reduce from 100 units to 10 to 15 units. So a 100Kb JPEG file goes down to between 10Kb and 15Kb at 60% and your eye can't tell the difference.

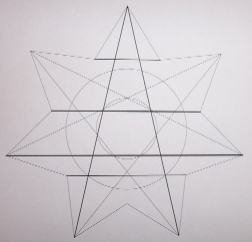
IMAGE 3: color quality at 100%

This version is the same size as the two above, but is the full quality version (100% color quality). If you look closely at the left of the two pictures above it, you will see that although I said in the paragraph above that it was smooth it too actually has faint color blocking. You really have to look hard to see it and it is an effect of the almost uniform color. If there had been even a slightly higher gradient in the color, the blocking would not have happened because the natural color change would override the blocking. What this means in practical terms is that the 60% quality shot can be seen to have faint blocking in an area of uniform color, but that pretty much doesn't exist in pictures of wood, so the 60% version in real wood pics can't be distinguished from the 100% version, BUT, the 60% version is about one tenth the file size of the 100% version, which with a 56Kb modem makes a BIG difference.


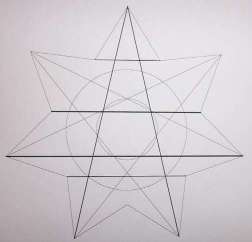
IMAGE 4: size at 50% of 50% (read below and that will make sense)   (maybe), and IMAGE 1 (again):size at 25%

These two have exactly the same picture size and file size and exactly the same quality setting (60%), BUT they were arrived at differently, and are obviously different in actual quality. To see this, examine the bottom and top of the outermost of the two circles. Also, go to the top point and then look at to closest points to it and the almost horizontal lines that go from those points inward. In both cases, you can see clearly that the figure on the left has superior quality.

The one one the left was arrived at by taking the original and reducing it to 50% and then taking the result of that and reducing it to 50% again. The one on the right was arrived at by taking the original and reducing it directly to 25%. Since these end up with exactly the same size result, I expected them to be the same, but they clearly are not. For reasons I have not bothered to research, the JPEG algorithm clearly handles a 50% reduction in a very smooth fashion, but handles other reductions much less smoothly. I've done 40% and 60% and lots of other, and ONLY a 50% reduction maintains the quality to a degree I find acceptable.

SO ... all of the pics on this site come in up to three sizes but the sizes are all based on multiples of two. If there is one "enlargement" it is exactly twice the size of the smaller and if there is a second "enlargement" it is twice the size of the middle version. In reality, all pics are based on the largest of the available sizes and the others are half its size or half that again. If you look at IMAGEs 1, 2, 3, and 5 you will see that they all have the same line quality (well, IMAGE 2 is so degraded that even the lines look worse) and NONE of these would be allowed on the site. Only IMAGE 4 was produced using the "proper" technique and resulting in a small image with high quality.

Most browsers have a bar at the bottom where the name of the currently displayed picture can be seen. If you click on a wood pic to get an "enlargement" you will see the name of the JPEG file and it will generally include a designation such as "s50". The "s" number is the size and it will be 100, 50, or 25. 100 means a 100% sized original, 50 means a 50% reduction and 25 means a 25% reduction (that was arrived at by doing a 50% reduction of the 50% reduction, NOT a 25% reduction of the 100% original), and for all of them, they were saved with a 70% JPEG setting on quality.

If you see pics with no "snn#34; designation in the file name, then it is the original and was too small to reduce further (but it is still reduced in quality to a 70% JPEG setting, and note that this INCLUDES any quality reductions the original may have, so if I get a JPEG that is tagged at 70% or below, then my quality reduction actually does nothing).

If you have actually read all of the above and are not now TOTALLY bored and/or weirded out, then you are strange and probably should find a person of the opposite sex and go see a movie. Or something.